Well, first there's THIS:

I got this sweet award from Grams. Grams is such a kind lady and is always thinking of others. I am thankful that I met her while I have been blogging and am so grateful for her friendship.
Thank you so much Grams!!
And then there's THAT:

"What is THAT?" I can hear you asking. THAT, my dear blogging friends, is a cheesecake. Now, you might be surprised by my answer- because I will agree with you when you say "THAT does not look like a cheesecake." So, here is the story. A little while ago I was reading my friend Carrie's blog and she posted this lovely Pumpkin Cheesecake recipe. And, while cheesecake is not my favorite thing, I thought- "Wow, that sounds good..... and easy."
And so I decided to give it a try. In case you are too lazy busy to click on over to Carrie's blog, here is the recipe.
The Cheesecake Factory’s Pumpkin Cheesecake
The crust:
1 1/2 cup graham cracker crumbs
5 tablespoons butter, melted
1 Tbsp sugar
The filling:
1 cup sugar
3 (8 oz) pkg cream cheese, room temperature
1 tsp vanilla
1 cup canned pumpkin
3 eggs
1/2 tsp cinnamon
1/4 tsp nutmeg
1/4 tsp allspice
whipped cream
1. Preheat the oven to 350 degrees.
2. Make the crust by combining the graham cracker crumbs, butter, and 1 Tbsp sugar in a medium bowl.
3. Stir well enough to coat the crumbs with butter, but do not over do it! Keep it crumbly.
4. Press the crumbs into the bottom and about 2/3 of the way up the sides of an 8 inch springform pan.
5. Bake the crust for 5 minutes and set aside until you are ready to fill it.
6. In large mixing bowl, combine the cream cheese, 1 cup sugar and vanilla. Mix with electric mixer until smooth.
7. Add pumpkin, eggs, cinnamon, nutmeg and allspice and continue mixing until creamy.
8. Pour the filling into the crust.
9. Bake for 60 - 70 minutes, or until a fork inserted into the middle comes out clean. The top will be a little dark.
10. Remove the cheesecake and allow to cool until it is room temperature. Then put it in the fridge to continue to cool. Serve with whipped cream.
Now doesn't that sound easy? Well, mostly easy- I have no idea what a springform pan is, so obviously I do not have one. So, I bought a graham cracker crust (which, by the way, Carrie said she did too). The recipe said to use an 8 inch springform pan (whatever that is) so I bought a 9 inch crust.
I made the filling and as I was pouring it into the crust I realized I was not going to have enough room for all of my filling. I showed Rich who said, "I don't think you should add anymore filling to it." So, I added bit more- because what does he know about baking. (apparently more than I do) As I was adding a bit more filling I reasoned, "There is no baking soda or baking powder or whatever makes stuff rise, so it's not going to get any bigger."
I am sure that my mom is smiling proudly at this very moment about my baking abilities.
Anyhoo- since I didn't use all the filling (I still had enough extra filling to fill 6 muffin tins), I decided to set to oven for 50 minutes. When I went to check on my cheesecake after the 50 minutes were up, this is what I saw:

When I saw this, I laughed right out loud and said "I must take a picture, my blogging friends will enjoy this story." As you can see the cheesecake is kind of exploding out of the pan. Well, when I tested it to see if it was done, it was not. So, I
trimmed ate the sides off and put it back in the oven for 10 more minutes.

I took it out 10 minutes later and it was done. When I took it out it looked like the picture I posted at the top. About a half hour later it looked like this picture here on the right. It was all sunken in and just did not look quite right. I don't think you can really tell just how very wrong it looked by these pictures.
So, does anyone know what I did wrong? I followed the recipe exactly as it is (except for the springform pan part) so I have no idea what I did wrong. It tastes pretty good, so I don't think I messed up any of the ingredients. If any of you who have more baking experience have some idea of why this happened, please let me know!
And now the OTHER:
When Hailey turns 18 in the year 2024 public in-state college tuition is projected to be $161,589. Public out of state tuition will be $259,854 and private school will be $328,977. So, I am thinking of adding some Google Ads to my blog to try to make some extra money. Now I am sure I won't make enough to pay for college, but every little bit helps. So, have any of you added Google Ads to your blogs? And do you find it is worth it?


 First we have the ingredients- it's a lot, I know. If you have a husband or children you might want to do like I did and put a little sticky note on the Oreos that says, "Please do not eat 1 1/2 rows."
 Now, here is the first step. Put your 2 (1 pound) bags of White Chocolate Mint candies into a microwave safe bowl. Put into the microwave for 1 minute.
 Next, if you are like me and you do not like the feel of smushed Oreo cookies on your hands- put 1 1/2 rows of Oreo cookies into a Ziploc bag.
 Take your chocolate out of the microwave and stir it. Then put it back in for 1 more minute.
 While the chocolate is melting- crush up the Oreos that are in the Ziploc bag.


 Then dump the crushed Oreos into the bowl.
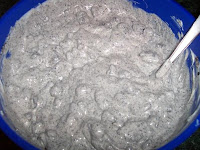 And, stir it all together. Do this quickly so that chocolate does not start to get hard.

 Lastly, take a picture of the finished product while Rich decides to stick his hand in front of the camera because he thinks it's funny you are taking pictures of your recipe.
 Ahhh- there- that is better. The lovely Peppermint Bark.


